
Duct Tape Dummy Tutorial
I was in need of a way to display some of the costumes I had put together, specifically ones that were made to fit me, one option would be to have a body cast made but that would be pretty expensive, I heard about people making mannequins from duct tape and decided to give that a go.
Things you'll need
A pair of Scissors
about 7 rolls of duct tape (that's how many I used)
a Sharpie
some old scruffy clothes (these will be cut up so use something you don't want)
atleast one helper, the more the merrier !
This took around 2 hours for me but that was because I had one helper, he had to cut out all the strips of tape before they were applied. The more people you have to help, the more streamlined the process will become. As stated above I ended up using 7 rolls of duct tape which were from a discount shop so they only cost £1 each. You are aiming to have about 2 or 3 layers of tape all over to ensure the mannequin is nice and strong.
Step one
Put on some old unwanted clothes, the more form fitting the better as this will improve how accurate the end product will be, I used an old pair of pajama bottoms and a long sleeved shirt. Depending on whether you want feet on your mannequin or not you should also put on a pair of old socks, I did because I wanted feet on mine. Tuck them all into each other so that they will stay together as one piece once the tape is applied.
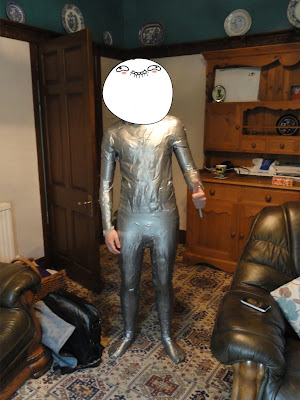
Apply the tape to the now sharply dressed model quite tightly but not so much the poor model goes blue in the face, remember that you need some breathing space ! I used 30cm strips of tape across the chest and stomach and a long continuous strip to wrap around the arms and legs. Make sure that you change the direction of the tape on each layer to increase the strength of the final piece, this should create a cross-hatched type effect as you re-cover the model.
Step Two
Time for some doodling ! Once you have your 3 layers on your model you need to mark out a seam line with a sharpie for when you cut the person out of the mannequin shell. I drew out mine to make the front and back into two separate pieces. Crosses were added every few inches to make it easier to line up your edges to attach them back together in a later step.

Step Three
Time to shed your newly acquired skin and get some fresh air on those limbs, cut along your your seam lines and free your model from their duct tape cocoon. I used gauze scissors for this step because they have a rounded edge and wouldn't cut the models skin.
Now you will need to reattach the seams together with more duct tape following the guides you drew on earlier.


The tight fit of the joints was enough to hold mine in place but you might want to add glue to the joints for a static pose or left glue free to add some poseability. With your mannequin placed inside the duct tape skin the empty shell now needs some meat on its bones. Fill the innards to make it strong and solid. You can use old rags, expanding foam, bubble wrap or whatever else springs to the imagination. It seemed easier to stuff the mannequin as the seam was being reattached, rather than try reach all the way down into the feet once it was all put it back together.

All assembled ! I added mine to a base, this was done by attaching two thick wooden dowels to a sheet of MDF, the wooden dowels sit inside the hollow PVC pipes of the legs to keep the mannequin upright.
Price List
Duct Tape - £7
Old Clothes + Rags for stuffing - Free
PVC pipes and joints - £15
Total Cost: £22
I was in need of a way to display some of the costumes I had put together, specifically ones that were made to fit me, one option would be to have a body cast made but that would be pretty expensive, I heard about people making mannequins from duct tape and decided to give that a go.
Things you'll need
A pair of Scissors
about 7 rolls of duct tape (that's how many I used)
a Sharpie
some old scruffy clothes (these will be cut up so use something you don't want)
atleast one helper, the more the merrier !
This took around 2 hours for me but that was because I had one helper, he had to cut out all the strips of tape before they were applied. The more people you have to help, the more streamlined the process will become. As stated above I ended up using 7 rolls of duct tape which were from a discount shop so they only cost £1 each. You are aiming to have about 2 or 3 layers of tape all over to ensure the mannequin is nice and strong.
Step one
Put on some old unwanted clothes, the more form fitting the better as this will improve how accurate the end product will be, I used an old pair of pajama bottoms and a long sleeved shirt. Depending on whether you want feet on your mannequin or not you should also put on a pair of old socks, I did because I wanted feet on mine. Tuck them all into each other so that they will stay together as one piece once the tape is applied.
Apply the tape to the now sharply dressed model quite tightly but not so much the poor model goes blue in the face, remember that you need some breathing space ! I used 30cm strips of tape across the chest and stomach and a long continuous strip to wrap around the arms and legs. Make sure that you change the direction of the tape on each layer to increase the strength of the final piece, this should create a cross-hatched type effect as you re-cover the model.

Step Two
Time for some doodling ! Once you have your 3 layers on your model you need to mark out a seam line with a sharpie for when you cut the person out of the mannequin shell. I drew out mine to make the front and back into two separate pieces. Crosses were added every few inches to make it easier to line up your edges to attach them back together in a later step.

Step Three
Time to shed your newly acquired skin and get some fresh air on those limbs, cut along your your seam lines and free your model from their duct tape cocoon. I used gauze scissors for this step because they have a rounded edge and wouldn't cut the models skin.
Now you will need to reattach the seams together with more duct tape following the guides you drew on earlier.

Step Four
To support the mannequin we need to build a skeleton to place inside, this is done with PVC pipe which you can pick up pretty cheapish from your local DIY shop. I forgot to take a photo of this step but here's one someone else made earlier over on TheDentedHelmet forum, from a guy by the username of TK1455. The one I created is basically the same.


All assembled ! I added mine to a base, this was done by attaching two thick wooden dowels to a sheet of MDF, the wooden dowels sit inside the hollow PVC pipes of the legs to keep the mannequin upright.
Price List
Duct Tape - £7
Old Clothes + Rags for stuffing - Free
PVC pipes and joints - £15
Total Cost: £22
No comments:
Post a Comment