Thursday 10 November 2016

Aku Aku Mask-Crash Bandicoot


Following on from my last build I decided to keep practicing more with using EVA foam as a prop making material, I was commissioned to make a replica of Aku Aku, a character from the game franchise Crash Bandicoot.


After drawing up templates the shapes were transferred to EVA Foam and cut out, the pieces were then rounded and smoothed using a dremel with a sanding drum attachment and then finished off with 400 grit sandpaper.


The next step was adding the wood grain texture to the pieces, I drew out a basic texture using a black rollerball pen so that I didn't indent the foam and could draw with a nice thin line unlike a sharpie. The lines were lightly scored using a scalpel and then hit with a heat gun to open them up. For they eyes I made clear plastic copies using worbla's transpa art.


At this point the foam was sealed with 4  thin coats of white plastidip, using white left me with a good base for the colours and once the white was dry I masked off the facial features so they could be painted.  


I used a few different paints for the colours on the mask, I used red plastidip for the brows, nose and lips. The eye bags were painted by hand using acrylic and the wood was painted using spraypaint. I wanted to use a variety to see how they worked with foam (this was tested on scraps first!) The spray paint was flexible but not to the same degree as the acrylic, it worked fine for this project but if I were to paint something that would be being flexed repeatedly I would opt to use a latex paint. 


The eyes were painted on the inside using acrylics, I gradiated from red to yellow to give a warm glow, this was done by stippling the colours inside to give a rougher finish as airbrushing the colours I felt would have looked too clean and perfect for the characters appearance. 


The final step was detailing, using acrylic washes I built up grime to seep into the grain of the pieces and dull the bright colours down a little to make him a little more realistic. Light dry brushing was applied in certain areas to bring the colour back through, at this point the eye lenses were attached along with the feathers and his goatee which was made from an artificial leaf.

Monday 31 October 2016

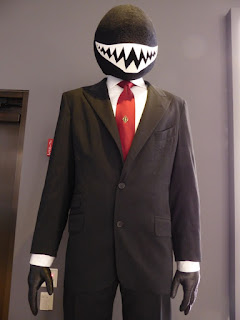
Suicide Squad Sharkhead Thug


I was commissioned to replicate one of the masks worn by the thugs accompanying joker in the Suicide Squad film, the helmet is fairly basic in shape and design so rather than sculpt anything and make hard copies I created the shapes using foam instead.


I created a foam helmet pattern almost the same as a motorbike helmet in shape, once I was happy with the pattern I cut the pieces out of EVA foam and used contact adhesive to attach them together, The seams needed to be nice and flush on this helmet as it was going to be covered in fabric and any raised seams would show through the fabric covering. The raised seams were given a light pass over using the sanding drum on my dremel and then smoothed further with 240 grit sandpaper. 


I pinned a piece of 4 way stretch material to one side of the helmet to draft all the shapes and placements for the eye holes, my final fabric was going to be a 4 way stretch material so I needed to pattern with a similar material to make sure it would lay the same way in the final fabric, once I was happy with the placements these pieces were transferred to pattern paper for the fabric and a thin card for the pieces that needed to be cut out using a blade.


I created a card template to make sure the vision holes would all line up correctly, unlike tougher materials such as leather stretch fabrics move and flex with the force of hole punch pliers, so to make the holes in this I used a hollow punch tool and mallet with a piece of scrap leather underneath to get a clean cut in the fabric.


The fabric cover was next stitched together and then the seam was splayed open and tacked down at the ends and in a few other spots to keep the seam flat for a smoother appearance. I used contact adhesive to bond the centre seam of the fabric to the helmet, I started from the lip under the chin and worked my way along a couple of inches at a time. I pinned the glued fabric to the foam along the seam allowance to keep it in place as I went, keeping the seam of the fabric in line with the seam of the foam so that I knew it was maintaining a straight line.

Once the glue had dried I applied a thin layer (thin enough so that it doesn't seep through the fabric and leave a mark) of glue to the area of the fabric where the vision holes were punched and secured them down doing one side then the other, by only putting glue on the fabric rather than both the foam and fabric the glue doesn't grab the material as it is meant to immediately so there is time to shift the fabric where needed to make sure both sides are lined up, once that had dried I worked my way along the lip gluing under the helmet doing one side from front to back and then the other side. Working with stretch material if you pull and stretch the material too much and go around in a circular motion when you get to the end you can end up with bunched up excess material because it has been stretched too much, doing one side at a time you can make sure the fabric is stretched evenly.


Once all the glue had fully dried I drilled the holes through the foam using the pre-punched holes in the fabric as guides, this is why the holes were fixed down with glue, so that they stay lined up with the holes in the foam. I used my dremel with a diamond ball burr bit to drill through the foam as they gave a cleaner cut than a standard drill bit. The dremel speed was set at 20 RPM, any slower resulted in a rough hole and any faster was hard to maintain good control. Vision was... okay, it was hard to see things close up but better from a distance so walking was fine, just don't try read with it on haha. After this padding was added to the interior to fit the client.


The final piece of the mask was the shark teeth, these were cut from a large A3 sheet of craft foam, this larger sheet was thicker than the smaller A4 sheets of craft foam which added a little more strength and dimension to the teeth as they stood out straight rather than flopping down onto the surface of the helmet similar to the original helmet. As the mouth is white I sealed the teeth with a few layers of white plastidip to make it easier to maintain a clean white finish. The teeth where then adhered in place onto the helmet and it was finished!


Thursday 10 December 2015

Batman Dawn of Justice Costume Pattern


Using a combination of Photoshop and Illustrator I created a digital pattern that could be printed onto 4way stretch Spandex and sewn together, much like the Spiderman costumes in the Raimi and Webb films. The black grip texture was created in Illustrator and was rendered in photoshop giving it a raised effect and weathering the light grey around the texture to show the darker undercoat colour as seen in the comicon display photos.


Underneath the texture I painted folds into the fabric similar to the actual suit. The final touch was to create cracks and creases in the texture in places where the suit flexes most like the display suit shows. Because it is a digital design, one click of the layers can give me a nice neat texture or a rough cracked effect.


A subtle transparent black layer darkened the trunks area of the suit to give the subtle hint to the comic costume and the pattern was finished!


The pattern is available for anyone who wants to put together their own batman costume!

Buy pattern here:


Friday 2 January 2015

Gotham By Gaslight Project: Part Four-Cowl


For the cowl I needed to create a leather/fabric look similar to the Gotham by gaslight design. The dominantly used method for bat cowls is a clay sculpt and a latex/urethane pull. My sculpting skills aren't quite up to the level for a realistic leather textured sculpt, and that would require a quality sulphur free clay, silicone and fiberglass for the mould and urethane to create a casting which would make the build an extremely expensive and time consuming  process. This project needed to be done to a smaller budget so I decided to base my build method around the process used on the 1966 batman cowl. The 66 cowl used a fiberglass shell wrapped in stretch satin. My method would be a variation on this idea. 

The base for my build was a polystyrene mannequin head, the head measured in at 23", same as the actors head. I borrowed techniques from the talented kamui cosplay who was the person I discovered and learnt the basics of worbla from. I wrapped the head in cling film and then covered one side of the head in masking tape, I only needed half since this is a symmetrical build and the cling film prevented the tape from sticking to the polystyrene head.   


Once I had covered the form I roughly sketched out the shape I wanted and cut it out.


Darts were cut into the piece so that it could lay flat so that I could transfer the pattern to card stock.


I went through about three versions at the card stage, I took away a lot of the curve at the back of the head to make the final piece easier to put on, I also added another inch into the pattern size to make room for padding.


A final test fit, looking more like a Tron helmet than a bat cowl at this point. The face section I decided to do as a separate piece so that I didn't over complicate my patterns.


 The final pattern transferred to Worbla and cut out, I used a craft knife to cut my pieces out but a good pair of sharp scissors would do just as well. 


The head form was wrapped in tin foil to protect the head from the heat gun and and then a layer of cling film as a barrier between the form and the worbla as worbla sticks to anything when heated.


One side formed, the material holds its shape very well considering how thin it is, this would be due to the wood pulp trapped inside the thermoplastic. Worbla is very flexible and cosplayers who use the material often strengthen it by sandwiching two layers of worbla over a filling of sheet craft foam. I need something a little more rigid as this is not a piece of armour made to wrap around a body and flex with it, it needs to hold its shape.


Since worbla sticks to itself there was no need for glue, both halves fused together and became a single piece, any mistakes and the worbla can be reheated over and over until you get the shape you want.


To strengthen the piece I thinned bondo in resin and slush cast a layer inside the form, I then spent 2 days filling and sanding the outside of the fro mto get it nice and smooth, the worbla was an quick and lightweight hollow frame for me to build on as I only needed one cowl so there was no need to sculpt a solid master and mould it.


The face section began as a flat piece of worbla, I line it up with the centre of the head form and used pins to keep the piece lined up to make sure it was symmetrical. I gradually heated and shaped the sheet around each of the facial features and pushed the excess material into small folds over the cheeks, these were then cut off and the resulting seam was heated and stuck together. 


Overlaying the main head piece I made I marked out the cut lines for the face area, leaving a lip of extra material to use to bond it to the main head form. 


The nose was patterned in card and then the card form was wrapped in worbla, heated and then pressed into place.


The face piece was glued in place and then filler was added to blend the face section into the rest of the head.


I drew out one eye, cut it out using a dremel with an assortment of bits and then checked the sizing to make sure there was good visibility, one of the advantages of making a mask piece hollow at the start. once I was happy I traced the eye and made a stencil from paper to transfer it to the other side. Once both were cut out a dremel with a sanding drum attachment was sued to round out the corners and then the edges were hand sanded down. I used my dremel's sanding drum again to equalize the thickness of the lips on the eye holes this was done from the inside and some final shaping by hand with sandpaper.


The ears were made as concave shapes, a little different to the usual movie cowls but this adds to the wet moulded leather look and also gives them a slightly stronger resemblance to actual bat ears, these were made as thin worbla pieces and will be wrapped in the fabric I decide to use.


The ears were heated over a metal ruler to angle them and then the base was heated and pressed onto the cowl to give it the same curve. Worbla stays workable for a while after it is heated so make sure the part has cooled before you start working on another area of the same piece, otherwise you'll ruin the shape you just made!


I drilled holes into the pieces so that I could relocate them back in the same place once both the pieces were wrapped in material. I will use rivets/screws to permanently attach the ears once they are covered.


The cowl shell was tweaked a little bit at this stage, I decided to give the nose a more hooked, gargoyle look, the whole piece was given a coat of primer to neaten it up ready for padding to fit the actor.


For padding I hot glued scrap black cotton onto pieces of 1.5cm thick foam, a pad was hot glued onto the top of the head and a thin strip was also glued to the back of the head, this was to correct the eye level of the actor looking out of the mask and to push the face of the mask closer to the actors own face. After test fitting the cowl fit well and was ready to be 
patterned over to create the fabric covering.

Saturday 6 December 2014

Gotham By Gaslight Project: Part Three-Belt Buckle


The buckle for the utility belt was heavily based on Boer war belt buckles to give the design a functional and period accurate design. The idea behind the detailing is that this piece is a found item that has been adapted for the main characters use. The piece has been detailed to look like a police officers belt which also links to the characters sense of justice and order.


I used multiple photographs of actual Boer War buckles photographed on top of a ruler to create 1:1 scale technical drawings in Illustrator.


I separated each piece into a separate drawing and imported them from Illustrator into Solidworks. Each piece was extruded and detailed with textures and filleted edges.


A quick render of the grubby brass finish I will try to create with the finished pieces. I originally wanted to have these pieces 3D printed in actual brass because it would be much stronger than plastic and would have a much more realistic finish. However after receiving a quote back I found this wasn't a cost effective option so I will instead be printing the buckle in plastic and painting it to look like dirty brass.


I received my 3D printed parts, unlike the last time I  had something 3D printed I opted to have the item "polished" so that it would be smoother, even though it was slightly smoother there was still an obvious texture to the piece so I took to smoothing the surface with spot filler and various grades of sandpaper.


 The pieces were given their usual coats of primer and wet-sanded from 600 grit upping grits  to 1200.


But then disaster hit when my nicely smoothed surfaces became a mottled brass mess. My test piece with the brass paint had come out nice and smooth but for unknown reasons this time it did not react well, this brand was a recommendation I found online but I did have a similar colour I had used before. So after waiting patiently for the paint to cure I stripped it all back down and repainted.


Much nicer!

After a few layers of acrylic wash to give it a bit of grime the buckle was given two coats of lacquer and it was done!