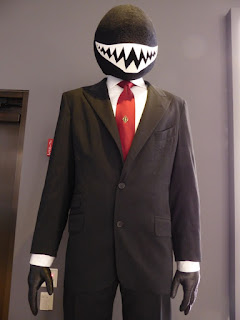
I was commissioned to replicate one of the masks worn by the thugs accompanying joker in the Suicide Squad film, the helmet is fairly basic in shape and design so rather than sculpt anything and make hard copies I created the shapes using foam instead.
I created a foam helmet pattern almost the same as a motorbike helmet in shape, once I was happy with the pattern I cut the pieces out of EVA foam and used contact adhesive to attach them together, The seams needed to be nice and flush on this helmet as it was going to be covered in fabric and any raised seams would show through the fabric covering. The raised seams were given a light pass over using the sanding drum on my dremel and then smoothed further with 240 grit sandpaper.
I pinned a piece of 4 way stretch material to one side of the helmet to draft all the shapes and placements for the eye holes, my final fabric was going to be a 4 way stretch material so I needed to pattern with a similar material to make sure it would lay the same way in the final fabric, once I was happy with the placements these pieces were transferred to pattern paper for the fabric and a thin card for the pieces that needed to be cut out using a blade.
I created a card template to make sure the vision holes would all line up correctly, unlike tougher materials such as leather stretch fabrics move and flex with the force of hole punch pliers, so to make the holes in this I used a hollow punch tool and mallet with a piece of scrap leather underneath to get a clean cut in the fabric.
The fabric cover was next stitched together and then the seam was splayed open and tacked down at the ends and in a few other spots to keep the seam flat for a smoother appearance. I used contact adhesive to bond the centre seam of the fabric to the helmet, I started from the lip under the chin and worked my way along a couple of inches at a time. I pinned the glued fabric to the foam along the seam allowance to keep it in place as I went, keeping the seam of the fabric in line with the seam of the foam so that I knew it was maintaining a straight line.
Once the glue had dried I applied a thin layer (thin enough so that it doesn't seep through the fabric and leave a mark) of glue to the area of the fabric where the vision holes were punched and secured them down doing one side then the other, by only putting glue on the fabric rather than both the foam and fabric the glue doesn't grab the material as it is meant to immediately so there is time to shift the fabric where needed to make sure both sides are lined up, once that had dried I worked my way along the lip gluing under the helmet doing one side from front to back and then the other side. Working with stretch material if you pull and stretch the material too much and go around in a circular motion when you get to the end you can end up with bunched up excess material because it has been stretched too much, doing one side at a time you can make sure the fabric is stretched evenly.
Once all the glue had fully dried I drilled the holes through the foam using the pre-punched holes in the fabric as guides, this is why the holes were fixed down with glue, so that they stay lined up with the holes in the foam. I used my dremel with a diamond ball burr bit to drill through the foam as they gave a cleaner cut than a standard drill bit. The dremel speed was set at 20 RPM, any slower resulted in a rough hole and any faster was hard to maintain good control. Vision was... okay, it was hard to see things close up but better from a distance so walking was fine, just don't try read with it on haha. After this padding was added to the interior to fit the client.
The final piece of the mask was the shark teeth, these were cut from a large A3 sheet of craft foam, this larger sheet was thicker than the smaller A4 sheets of craft foam which added a little more strength and dimension to the teeth as they stood out straight rather than flopping down onto the surface of the helmet similar to the original helmet. As the mouth is white I sealed the teeth with a few layers of white plastidip to make it easier to maintain a clean white finish. The teeth where then adhered in place onto the helmet and it was finished!


