Thursday 28 August 2014

MK Legacy Part 5-Menpo Mask


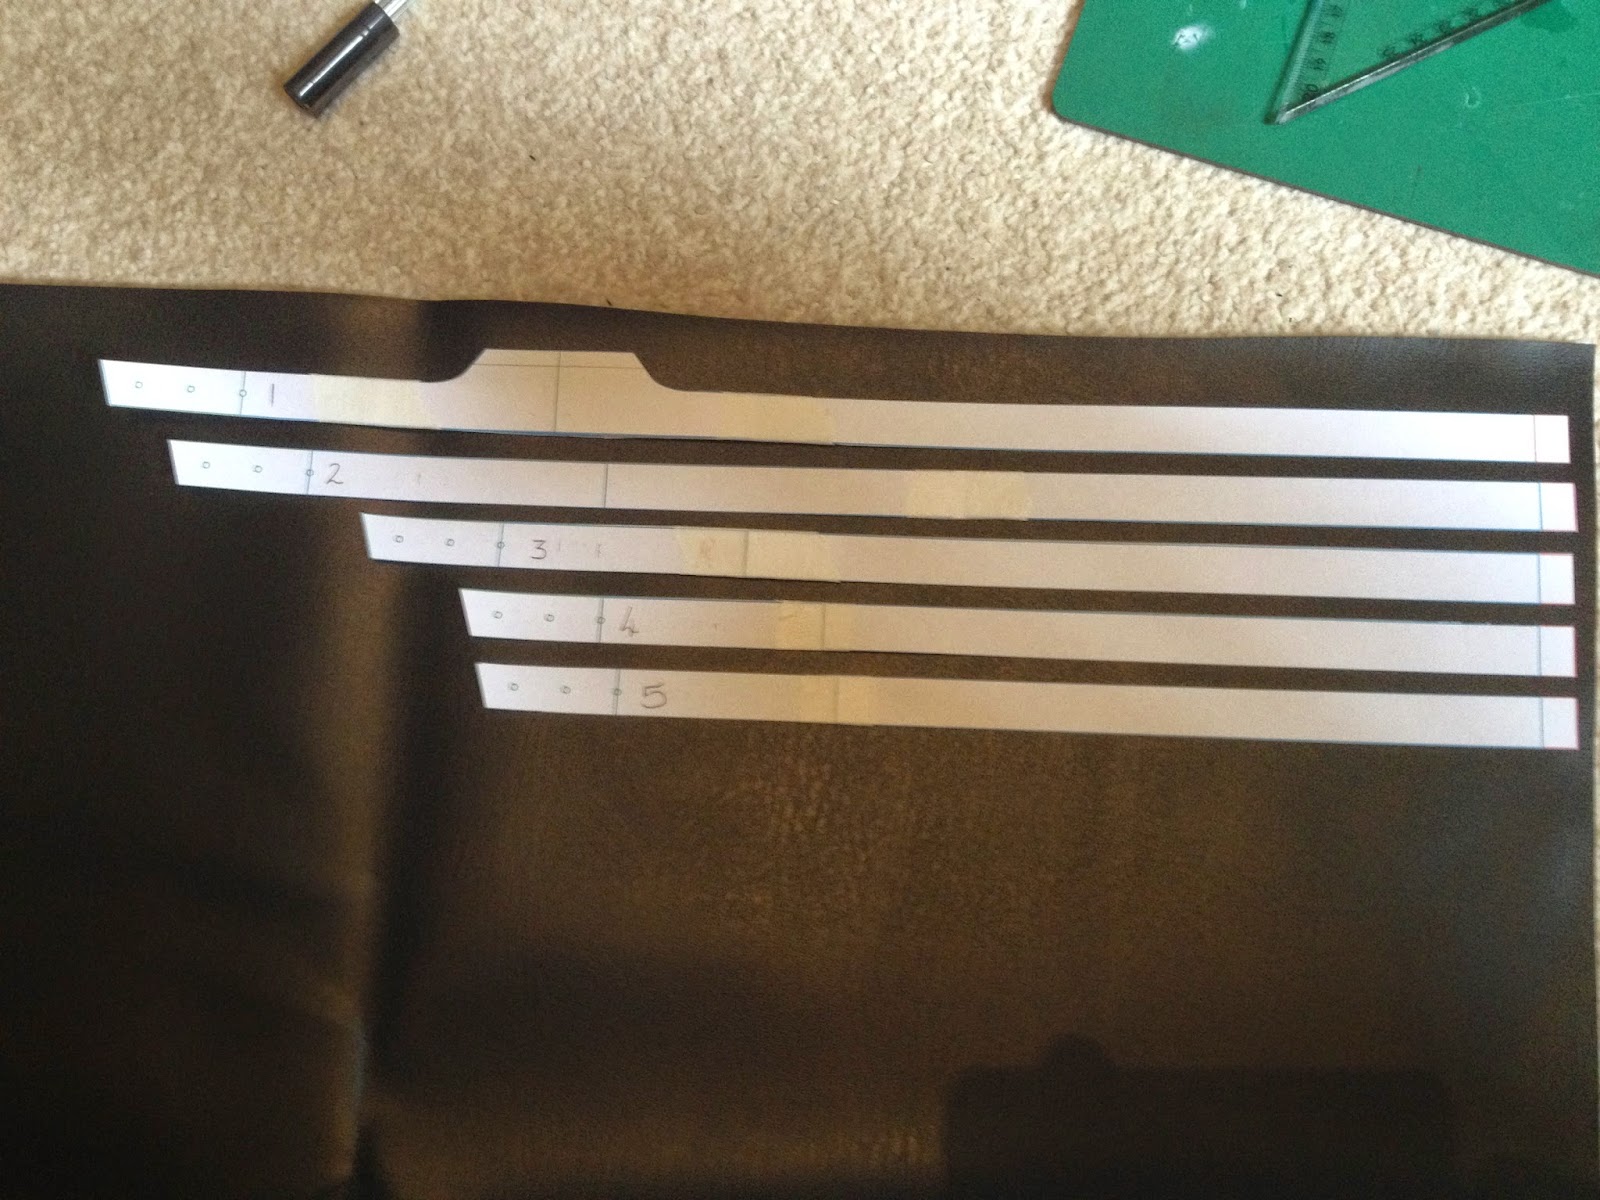
The Menpo worn by Scorpion in season 2 is a completely different mask than the one used in the first season, the mask used in the first season was a metal Menpo created by This Company, I took a few screen caps form Scorpions episodes and used them as the basis for my blueprints I created in Illustrator.


These were scaled to fit my face were then turned into pattern pieces to be cut out of 2mm Sintra.


Everything was slotted together to give me a 3D guide for the main face shapes. The negative spaces were then filled with Bondo and sanded back to the guides.


I prefer using sintra for this process as it is easier to sand flush with filler than denser materials such as MDF.


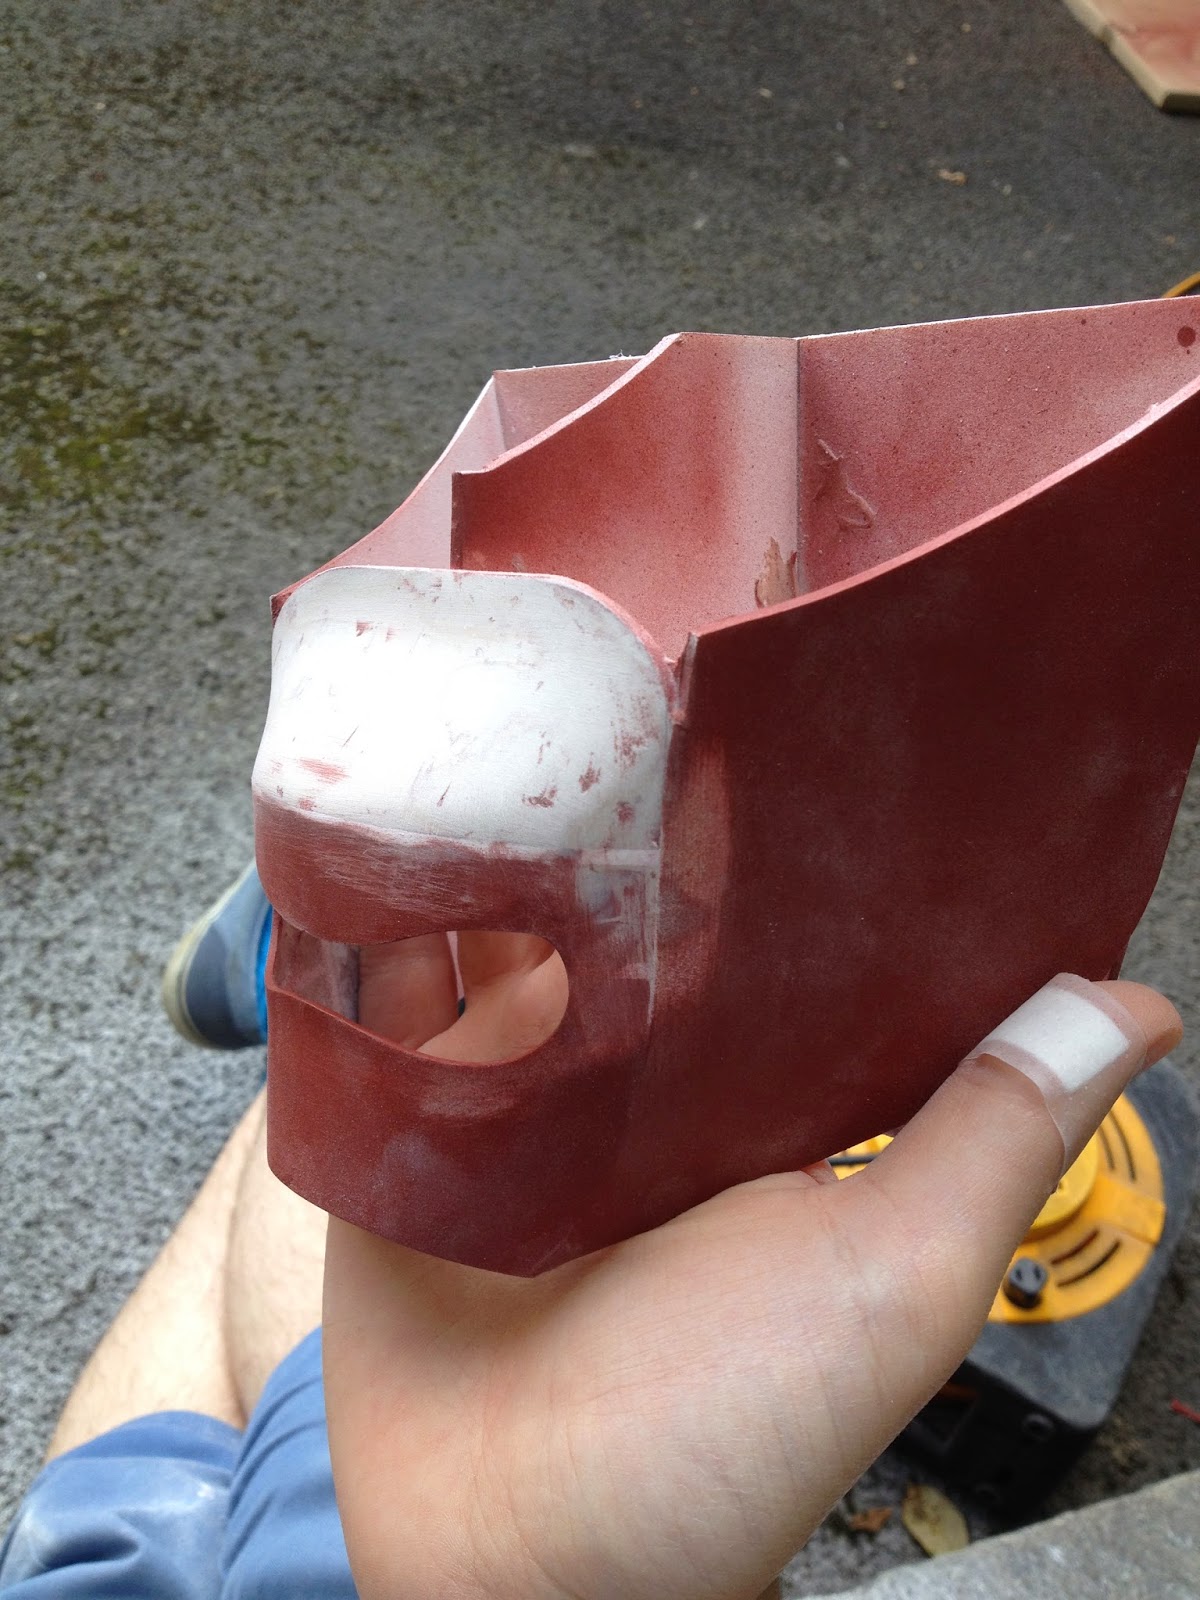
The mouth was cut out at this stage and the top lip was blended back to the face plate.


The next area to block in was the nose, this was done using the sintra framework method like the rest of the mask.


To block out the shape of the nostrils I used masking tape to sketch out the size of the nostril both height and width. I then covered the masking tape with release agent and blocked out the shape with filler.


The teeth were made using strips of sintra with the lines being engraved with diamond files. The rest of the cheek area was also blocked in.


After being sanded, wet-sanded, primered, and wet sanded again the surface was ready for paint. The mask had 5 coats of brown paint and then was top-coated with  6 layers of gold paint. Once the paint had been left to harden for 2 days the gold was wet-sanded to reveal the brown paint underneath to weather the surface. I then made the mask ties and attached them behind the cheek plates.


Sunday 24 August 2014

MK Legacy Scorpion Part 4-Tabard


I'm not sure what the correct term is for this costume piece so throughout these posts I'll just refer to it as a Tabard haha. I began the pattern for the Tabard by modifying a T-shirt pattern block I already had, from there I measured the small of my back and after narrowing the bottom of the block to this measurement I drew a straight line from the arm scye (The arm hole seam) down to the waist to give me the basic shape of the back. This was then extended down further as the back of the actual Tabard covers the wearers butt. 


The front was simply a long straight strip with an angled end, the top had the same shoulder seam angle as the back so that they matched up correctly. I toiled my patterns in Calico first, this let me see how the piece actually laid on a person, Toiling is always important to do before committing to your chosen fabric because if something doesn't fit right and you've already sewn it in your chosen material it will just be a waste of  material, money and time. After checking the fit on myself I found I needed to lengthen the front and widen the shoulders slightly as the actual costume piece juts out past the shoulders.

Once these adjustment were added to the paper patterns I then lifted a copy of them onto a fresh sheet of paper. The costume piece has a pleated look to it and I planned to make each pleat as a separate piece, a 1cm seam allowance was added to all of these pieces, plus an extra cm on the sides of each of the pleat section so there was space to overlap each piece onto the next, to make the item look like one large pleated piece and not lots of separate smaller pieces stitched together.


I decided to use Douppion silk for the Tabard as it has a similar finish to it as the actual costume, I ended up with about 10 samples of silk, I didn't realize how many shades of gold there were haha. 


Once the basic pieces were cut out and sewn together the pleats were pressed into the front and back.


Once the pleats were pressed in I ran a stitch along the pleats to prevent them from unfolding and giving me accordion shoulders.


Once I had reached this stage it was time to singe the fabric, this is done before adding the lining so that once the lining is attached you won't be able to see the clothing underneath through the holes in the tabard.


Lining attached and a quick test fit. Next step was to distress and weather the Tabard and Gi uniform underneath. 


To give the costume pieces a ragged edge and distressed appearance I first unpicked the hem of the uniform, next using a craft knife I hacked at the bottom edge to chop little segment out so it was uneven, as well as a few larger chunks to add variation. I also slashed small star shapes into the fabric in random places to make small holes, all of this was then feathered out and torn to look more realistic using a rasp. I then grabbed random clumps of fabric and balled it up like a small cushion and grated it against the rasp, this help create a rough texture over large sections quickly. This was repeated all over the bottom of the garment from the bottom edge up to the waist as well as around the elbows.


To achieve the dusty look the bottom of the piece has I ground up some white chalk and sprinkled along the bottom and around any holes. I tried to add variations in the thickness of the line to make it appear more natural. This was ground in using my fingers and then I rubbed the fabric against itself to help ingrain the dust even further and feather it out a little more.

I used the rasp again to weather the bottom edges of the Tabard although this wasn't quite as extreme as the black uniform. 


I tried 2 different dye methods on some scrap silk to see if I could get a nice grubby shade, the first was a bath of black acrylic, boiling water and a teabag, the second attempt was a small amount of black acrylic diluted in boiling water and left to soak for an hour which gave me a pretty close match to what I was going for.


I made a large dye Bath in this method and left the costume to soak in the bath for an hour. After rinsing the excess dye out of the fabric the Tabard was left to air dry, once it was almost dry I used a spray bottle full of the dye I made and added another layer to the bottom of the Tabard as it dried, this was repeated a few times as it dried to give a gradiated and well worn look. The edges of the pleats were dampened with a brush and then using another brush a watered down mix of black acrylic was lightly brushed along the edge and rubbed in with my finger to give a feathered and natural looking grubby effect. (the bottom of the Tabard is still wet in this photo, the bottom is a little lighter and blended much more smoothly into the rest when it dried)

Sunday 17 August 2014

MK Legacy Scorpion Part 3-Boot covers


Once again I began by scaling up an image of the boot covers to fit me in Illustrator. The best part of patterning in Illustrator is that you always have a digital backup of all your patterns in case something happens to any of them, which since I'm always misplacing things is a good idea for me haha.


A tricky part of pattern cutting on leather/leatherette is that you can't just pin the patterns to the piece because it will leave marks. I've seen others use clothes pins and also spray mount to keep their patterns from budging. Since this was a relatively small piece I simply rolled some masking tape over itself so that it was double sided and that did the trick. This would take way too long on a larger piece on which I'd recommend the aforementioned spray mount.


I marked the back of the pieces for placement of each of the straps, there is no hem on any of these pieces so I couldn't just notch where these pieces lie in the seam allowance. 


Each of the straps were measured whilst wearing the Tabi boots for the costume, to allow for the extra size from the thickness of the material. The top strap is riveted onto the boot cover but the rest were top-stitched using the lines on the back to line everything up.


The straps are longer on one side as the boot covers buckle on the inside of the leg rather than centred at the back.


 The covers in the series are a grubby weathered gold colour, to create this effect I lightly misted a single coat of gold spray paint onto them, this left feathered patches of black showing through and also with there only being a thin coating the colour was quite dull and muted so as it didn't appear shiny and brand new.


Using 1500 grit wet and dry sandpaper I lightly wet-sanded the edges of the pieces and buffed in small random areas to make the gold appear even more worn out. The buckles were added after this stage. To help stop the covers form shifting whilst walking I also added Velcro patches to them and the boots.


Next up is the Tabard!

Friday 15 August 2014

MK Legacy Scorpion Part 2-Gauntlets


To start the gauntlets I made the base piece first, the main piece has an unfinished edge along the top and sides with top-stitched detail but the bottom of the gauntlet is rounded off. 


To achieve this I added a seam allowance to the bottom of my gauntlet pattern. This base piece was cut out of thin leatherette so that it would be easy to wrap around a form. 


For the form I simply used an old plastic folder I had laying around, it was thin enough to flex to the shape I needed and strong enough not to warp. The top-stitching around the gauntlet trapped the form onto the leatherette holding it in place.


The seam allowance was cut in increments of roughly 2cm to allow it to take the curve properly each tab was glued down and overlapped by the next.


This gave the piece a clean finished edge and added some thickness as well. Once this was repeated on the other gauntlet the detail pieces were made next.


Each piece was cut out twice in 2mm thick leather, using templates I made in Illustrator I marked and punched all the holes for the rivets, a similar guide was made to punch the corresponding holes into the gauntlets so that each piece matched up properly.

To better match the darker colour of the pleather each piece of leather was buffed with a coat of black shoe polish. For comparison the triangular piece is untreated and the strip has been coated.


The strips were riveted on first, I found anodised rivets that looked much nicer than black painted ones do. The straps were next sewn onto the main gauntlet piece. The triangular pieces act as cover guards that conceal the join so they were riveted on last.


Slots were cut into each strap to fit the buckles through. 


The pieces were checked for fit in case the straps needed any adjusting, but thankfully my measurements were right!


I managed to ID the actual gloves used, I believe they are called stealth bomber gloves and are made by a company called Fox. The next step is to grub these gauntlets up and give them a believable worn feel.

The dirt was applied all over the gauntlets with a slightly damp sponge, once dry they were rubbed down with a damp rag which left the texture in all the recessed areas to give them a grimy well used feel.


Sunday 10 August 2014

Mortal Kombat Legacy Scorpion Part 1-Waist wrap


This is a costume being made for an event in London in October, I chose the undead version to break away from the nice clean Props I usually make and get more practice with weathering. This project will also be heavily costume based rather than prop based like I normally do, again, building up skills so this project should be fun! 

I'll be splitting this project up into parts so I'll make a separate post for each costume part so as this post doesn't become ridiculously long.

First up I made the waist wrap, after screen-capping some shots from Scorpions episodes of the series I figured out the scale I needed to make the costume parts fit me. The waist wrap is extremely simple. The actual piece has a wrapped appearance but has a corset type fastening at the back, so rather than being one long continuous pieces it is instead separate layers that are attached together at the back.


Each piece was done in pleather, since it needed to be quite thin to allow a good range of movement and also I already had it lying around haha. The pieces have a ragged edge that has been cut into it at the bottom rather than worn in, so none of these pieces needed any sort of hem so they only took 5 mins to cut out. The pieces were patterned to lay on top of each other to create the layered look and tapered at the back to the same length.


To help make the different layers stand out the actual wrap used has a golden highlight along the bottom edge of each layer, I used a bronze enamel which was drybrushed along the bottom edges of each layer before being stitched together. I tested the colour on a scrap piece of material first to check it didn't stand out too much, this is only supposed to be a subtle highlight and not an obvious shiny gold band at the bottom.


At this point each of the pieces were layered together and the edges were trapped in by the two back panels that the lacing would go through, securing each layer in place. The rivets were hammered in next and to help go along with the worn in look I used an old fraying black shoelace to lace the back up. This was lace so that the knot would face the inside of the wrap and would be out of sight.


Next up, the Gauntlets!