Showing posts with label armour. Show all posts

Friday, 2 January 2015

Gotham By Gaslight Project: Part Four-Cowl


For the cowl I needed to create a leather/fabric look similar to the Gotham by gaslight design. The dominantly used method for bat cowls is a clay sculpt and a latex/urethane pull. My sculpting skills aren't quite up to the level for a realistic leather textured sculpt, and that would require a quality sulphur free clay, silicone and fiberglass for the mould and urethane to create a casting which would make the build an extremely expensive and time consuming  process. This project needed to be done to a smaller budget so I decided to base my build method around the process used on the 1966 batman cowl. The 66 cowl used a fiberglass shell wrapped in stretch satin. My method would be a variation on this idea. 

The base for my build was a polystyrene mannequin head, the head measured in at 23", same as the actors head. I borrowed techniques from the talented kamui cosplay who was the person I discovered and learnt the basics of worbla from. I wrapped the head in cling film and then covered one side of the head in masking tape, I only needed half since this is a symmetrical build and the cling film prevented the tape from sticking to the polystyrene head.   


Once I had covered the form I roughly sketched out the shape I wanted and cut it out.


Darts were cut into the piece so that it could lay flat so that I could transfer the pattern to card stock.


I went through about three versions at the card stage, I took away a lot of the curve at the back of the head to make the final piece easier to put on, I also added another inch into the pattern size to make room for padding.


A final test fit, looking more like a Tron helmet than a bat cowl at this point. The face section I decided to do as a separate piece so that I didn't over complicate my patterns.


 The final pattern transferred to Worbla and cut out, I used a craft knife to cut my pieces out but a good pair of sharp scissors would do just as well. 


The head form was wrapped in tin foil to protect the head from the heat gun and and then a layer of cling film as a barrier between the form and the worbla as worbla sticks to anything when heated.


One side formed, the material holds its shape very well considering how thin it is, this would be due to the wood pulp trapped inside the thermoplastic. Worbla is very flexible and cosplayers who use the material often strengthen it by sandwiching two layers of worbla over a filling of sheet craft foam. I need something a little more rigid as this is not a piece of armour made to wrap around a body and flex with it, it needs to hold its shape.


Since worbla sticks to itself there was no need for glue, both halves fused together and became a single piece, any mistakes and the worbla can be reheated over and over until you get the shape you want.


To strengthen the piece I thinned bondo in resin and slush cast a layer inside the form, I then spent 2 days filling and sanding the outside of the fro mto get it nice and smooth, the worbla was an quick and lightweight hollow frame for me to build on as I only needed one cowl so there was no need to sculpt a solid master and mould it.


The face section began as a flat piece of worbla, I line it up with the centre of the head form and used pins to keep the piece lined up to make sure it was symmetrical. I gradually heated and shaped the sheet around each of the facial features and pushed the excess material into small folds over the cheeks, these were then cut off and the resulting seam was heated and stuck together. 


Overlaying the main head piece I made I marked out the cut lines for the face area, leaving a lip of extra material to use to bond it to the main head form. 


The nose was patterned in card and then the card form was wrapped in worbla, heated and then pressed into place.


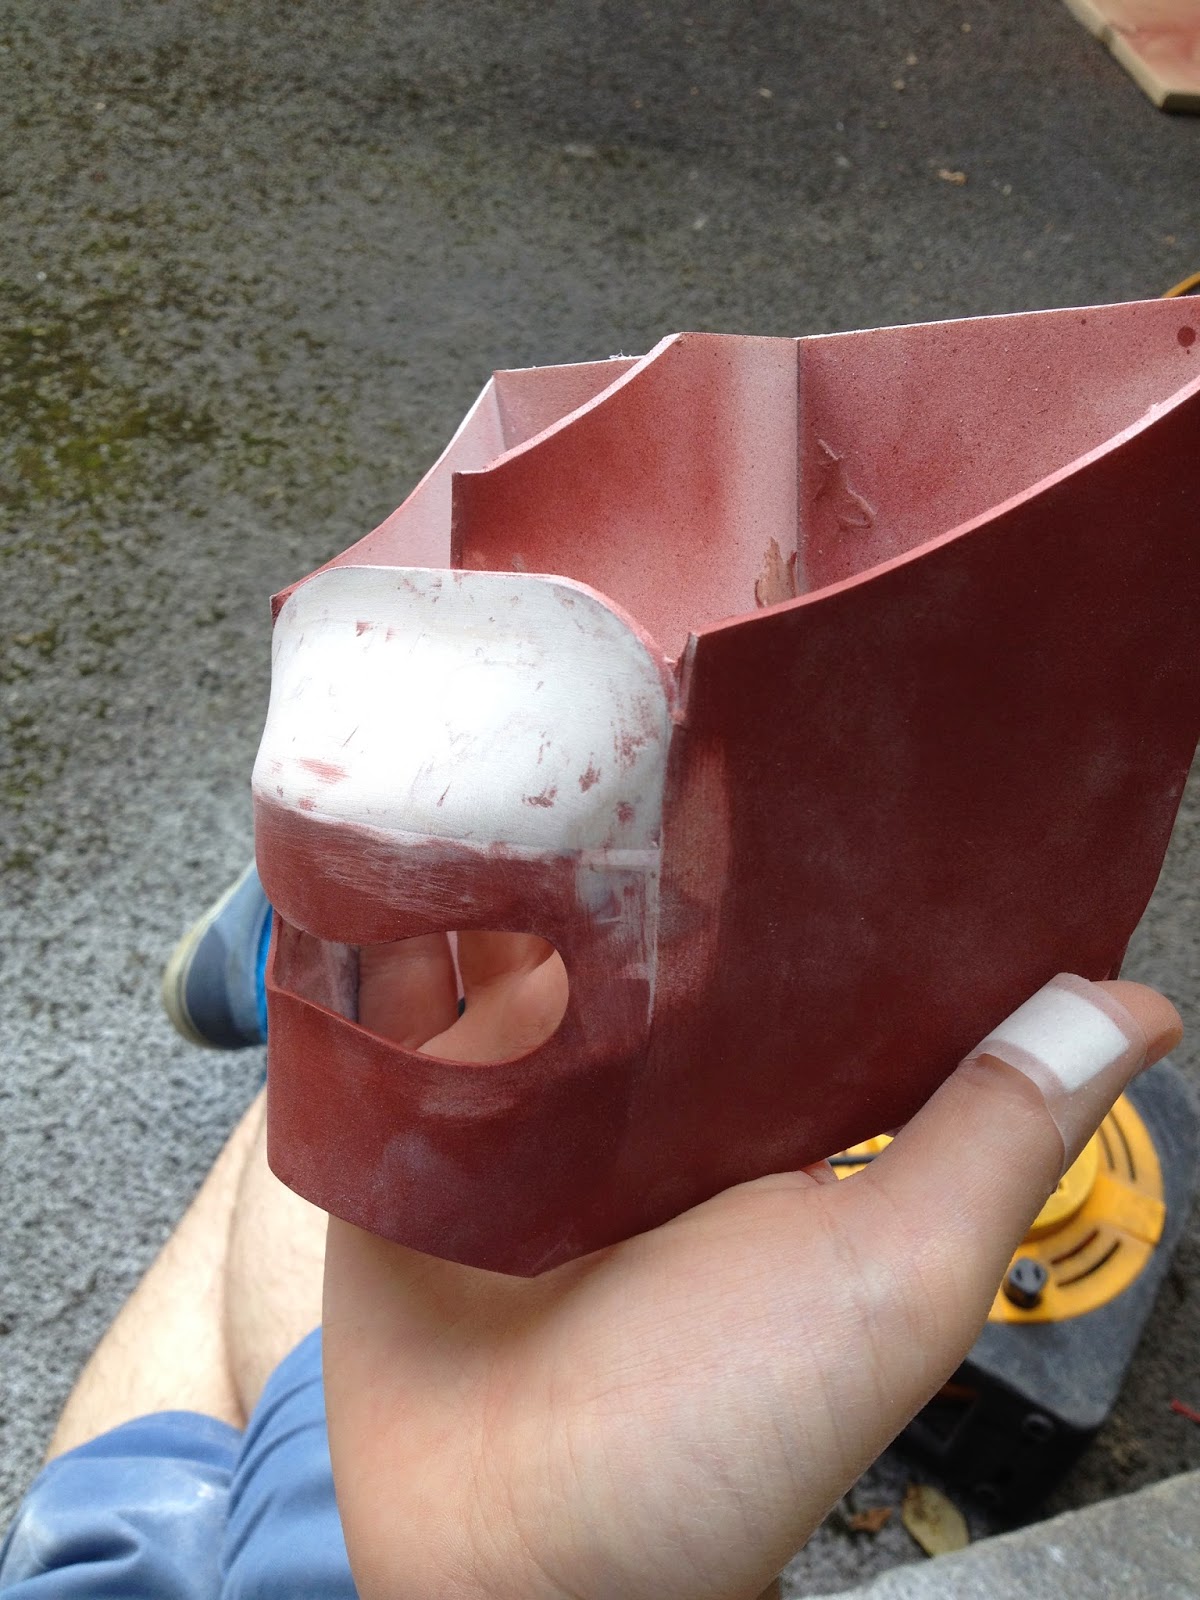
The face piece was glued in place and then filler was added to blend the face section into the rest of the head.


I drew out one eye, cut it out using a dremel with an assortment of bits and then checked the sizing to make sure there was good visibility, one of the advantages of making a mask piece hollow at the start. once I was happy I traced the eye and made a stencil from paper to transfer it to the other side. Once both were cut out a dremel with a sanding drum attachment was sued to round out the corners and then the edges were hand sanded down. I used my dremel's sanding drum again to equalize the thickness of the lips on the eye holes this was done from the inside and some final shaping by hand with sandpaper.


The ears were made as concave shapes, a little different to the usual movie cowls but this adds to the wet moulded leather look and also gives them a slightly stronger resemblance to actual bat ears, these were made as thin worbla pieces and will be wrapped in the fabric I decide to use.


The ears were heated over a metal ruler to angle them and then the base was heated and pressed onto the cowl to give it the same curve. Worbla stays workable for a while after it is heated so make sure the part has cooled before you start working on another area of the same piece, otherwise you'll ruin the shape you just made!


I drilled holes into the pieces so that I could relocate them back in the same place once both the pieces were wrapped in material. I will use rivets/screws to permanently attach the ears once they are covered.


The cowl shell was tweaked a little bit at this stage, I decided to give the nose a more hooked, gargoyle look, the whole piece was given a coat of primer to neaten it up ready for padding to fit the actor.


For padding I hot glued scrap black cotton onto pieces of 1.5cm thick foam, a pad was hot glued onto the top of the head and a thin strip was also glued to the back of the head, this was to correct the eye level of the actor looking out of the mask and to push the face of the mask closer to the actors own face. After test fitting the cowl fit well and was ready to be 
patterned over to create the fabric covering.

Thursday, 28 August 2014

MK Legacy Part 5-Menpo Mask


The Menpo worn by Scorpion in season 2 is a completely different mask than the one used in the first season, the mask used in the first season was a metal Menpo created by This Company, I took a few screen caps form Scorpions episodes and used them as the basis for my blueprints I created in Illustrator.


These were scaled to fit my face were then turned into pattern pieces to be cut out of 2mm Sintra.


Everything was slotted together to give me a 3D guide for the main face shapes. The negative spaces were then filled with Bondo and sanded back to the guides.


I prefer using sintra for this process as it is easier to sand flush with filler than denser materials such as MDF.


The mouth was cut out at this stage and the top lip was blended back to the face plate.


The next area to block in was the nose, this was done using the sintra framework method like the rest of the mask.


To block out the shape of the nostrils I used masking tape to sketch out the size of the nostril both height and width. I then covered the masking tape with release agent and blocked out the shape with filler.


The teeth were made using strips of sintra with the lines being engraved with diamond files. The rest of the cheek area was also blocked in.


After being sanded, wet-sanded, primered, and wet sanded again the surface was ready for paint. The mask had 5 coats of brown paint and then was top-coated with  6 layers of gold paint. Once the paint had been left to harden for 2 days the gold was wet-sanded to reveal the brown paint underneath to weather the surface. I then made the mask ties and attached them behind the cheek plates.


Sunday, 24 August 2014

MK Legacy Scorpion Part 4-Tabard


I'm not sure what the correct term is for this costume piece so throughout these posts I'll just refer to it as a Tabard haha. I began the pattern for the Tabard by modifying a T-shirt pattern block I already had, from there I measured the small of my back and after narrowing the bottom of the block to this measurement I drew a straight line from the arm scye (The arm hole seam) down to the waist to give me the basic shape of the back. This was then extended down further as the back of the actual Tabard covers the wearers butt. 


The front was simply a long straight strip with an angled end, the top had the same shoulder seam angle as the back so that they matched up correctly. I toiled my patterns in Calico first, this let me see how the piece actually laid on a person, Toiling is always important to do before committing to your chosen fabric because if something doesn't fit right and you've already sewn it in your chosen material it will just be a waste of  material, money and time. After checking the fit on myself I found I needed to lengthen the front and widen the shoulders slightly as the actual costume piece juts out past the shoulders.

Once these adjustment were added to the paper patterns I then lifted a copy of them onto a fresh sheet of paper. The costume piece has a pleated look to it and I planned to make each pleat as a separate piece, a 1cm seam allowance was added to all of these pieces, plus an extra cm on the sides of each of the pleat section so there was space to overlap each piece onto the next, to make the item look like one large pleated piece and not lots of separate smaller pieces stitched together.


I decided to use Douppion silk for the Tabard as it has a similar finish to it as the actual costume, I ended up with about 10 samples of silk, I didn't realize how many shades of gold there were haha. 


Once the basic pieces were cut out and sewn together the pleats were pressed into the front and back.


Once the pleats were pressed in I ran a stitch along the pleats to prevent them from unfolding and giving me accordion shoulders.


Once I had reached this stage it was time to singe the fabric, this is done before adding the lining so that once the lining is attached you won't be able to see the clothing underneath through the holes in the tabard.


Lining attached and a quick test fit. Next step was to distress and weather the Tabard and Gi uniform underneath. 


To give the costume pieces a ragged edge and distressed appearance I first unpicked the hem of the uniform, next using a craft knife I hacked at the bottom edge to chop little segment out so it was uneven, as well as a few larger chunks to add variation. I also slashed small star shapes into the fabric in random places to make small holes, all of this was then feathered out and torn to look more realistic using a rasp. I then grabbed random clumps of fabric and balled it up like a small cushion and grated it against the rasp, this help create a rough texture over large sections quickly. This was repeated all over the bottom of the garment from the bottom edge up to the waist as well as around the elbows.


To achieve the dusty look the bottom of the piece has I ground up some white chalk and sprinkled along the bottom and around any holes. I tried to add variations in the thickness of the line to make it appear more natural. This was ground in using my fingers and then I rubbed the fabric against itself to help ingrain the dust even further and feather it out a little more.

I used the rasp again to weather the bottom edges of the Tabard although this wasn't quite as extreme as the black uniform. 


I tried 2 different dye methods on some scrap silk to see if I could get a nice grubby shade, the first was a bath of black acrylic, boiling water and a teabag, the second attempt was a small amount of black acrylic diluted in boiling water and left to soak for an hour which gave me a pretty close match to what I was going for.


I made a large dye Bath in this method and left the costume to soak in the bath for an hour. After rinsing the excess dye out of the fabric the Tabard was left to air dry, once it was almost dry I used a spray bottle full of the dye I made and added another layer to the bottom of the Tabard as it dried, this was repeated a few times as it dried to give a gradiated and well worn look. The edges of the pleats were dampened with a brush and then using another brush a watered down mix of black acrylic was lightly brushed along the edge and rubbed in with my finger to give a feathered and natural looking grubby effect. (the bottom of the Tabard is still wet in this photo, the bottom is a little lighter and blended much more smoothly into the rest when it dried)